Tuesday, January 31, 2012

That Loving Feeling

Its hard to describe the feeling of rolling through the countryside on the bikes we know and love.
Non Roadster riders just don't understand, do they?
This 1958 cover art explains it all.


What do you say we keep it to ourselves and go for a ride!

Sunday, January 29, 2012

1939 Raleigh Sports Tourist

Things were quite different in the late 30's. The Raleigh was new in the U.S. and going against Schwinn and Columbia's heavy weight designs did not at first appeal to the American Market.
Marketed as adult transportation and not a child's toy, the Raleigh opened up a whole new world of cycling pleasure for the United States.

This was the earliest catalog that I have found from Raleigh of America located on Commonwealth Avenue in Boston, Massachusetts.


The text is clearly from the 30's and shows a different time of advertising. The information may have been too much for the American consumer. although, by today's standards, it may have not been enough!

The Raleigh Sports Model was soon to be known and sold as an "English Racer."


The cover of the Columbia Bicycle Catalog two years later.


Saturday, January 28, 2012

Simply, A Better Bicycle

Why settle for anything less then the Best? This 1960's Add Art shows you why The Raleigh was the best built bicycle in its day!


Friday, January 27, 2012

Selling the Raleigh to a Country of Automobiles

Campus transportation. Why buy a car when you can ride a Raleigh?


From the 1962 Raleigh catalog. Click on the image to see it larger.


So 1962! Can you see some dad spinning the front wheel while mom makes dinner in the basement? Handy? Right!


Thursday, January 26, 2012

Before and After


Scroll down to see the After photographs.

Raleigh Project One, The Finished Raleigh Sports


Raleigh Project One, Assembling The Raleigh.

"The Wordless Workshop."


I was told years ago that the Head of the Cotter follows the Crank, I'm not sure if it makes any difference, but this is how I do it.


The Raleigh went back together nicely. Having cleaned and polished parts in their own plastic bags made reassembly a snap. New tires, tubes, grips, crank cotters, ball bearings and a new shift cable were the only new parts needed. Replacement bits came to about 1/4 the cost of what it would cost to overhaul a standard modern bicycle. The project has been fun, easy and incentive to restore more Raleigh Roadsters.

Wednesday, January 25, 2012

Raleigh Project One, The Fitted Brake Wires

Up until the late 60's, Raleigh Sports came stock with "Fitted Brake Wires." Both ends of the cable had a soldered bead to operate the brake.
Different sized bicycles required different length cables and instead of simply cutting the cable to length and fixing it in a binder bolt, If you ever needed to replace a cable, you would need the whole part.


Raleigh made many different lengths and styles to fit both frame and brake lever. The Fitted cable came with the brakes barrel adjuster attached and when installing, you simply removed the barrel adjuster and remove the ends from the caliper and lever.
The women s bicycle required the cable to come from the underside of the brake for the step through frame. The Adjuster was fitted to the top of the brake, requiring a totally different cable design:


The Brake wires with this project were dirty and rusted. I assume that the cables were in fair shape in the center of the Housing and by spraying a light oil into the housing, I was able to free up any drag it had.


The ends were polished with oil and steel wool. I figured that the white polishing compound would only get stuck in the knurling on the adjuster and make more of a problem.


Although the cable housings were stained,all in all the Fitted Brake Wires look great!

Tuesday, January 24, 2012

Raleigh Project One, The Front Hub, H.40B

From the 30's to the 80', the front hub's on the Raleigh Roadsters seemed to change in design every 5 years. This hub is as nice as any from the years past. After the 50's thing got cheaper and harder to service. The worst was a hub in the late 60's that used a part called a "Spicketed Cone" To remove the wheel, you would have to spread the fork to drop it out of the fork ends, It could stick and be a real problem without a repair stand.
All Raleigh Roadster front hub designs used a axle that required that the wheel be placed on the bike in only one way. Replacing the wheel incorrectly could have the cones, overtime, come loose.


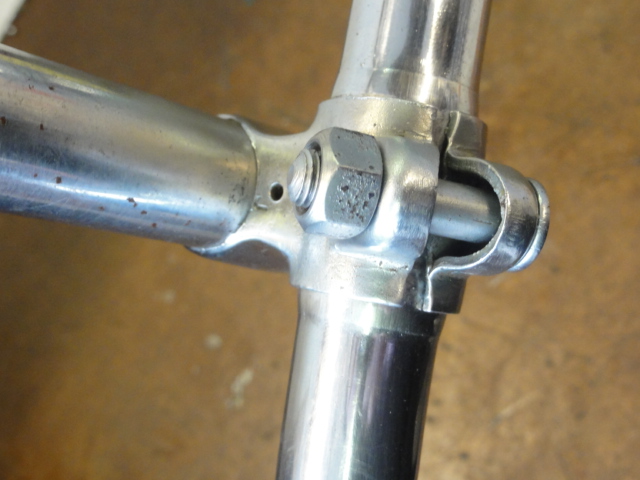
All of the Raleigh Roadster front hubs, except for the Sturmey Archer "Dynohub" used this axle design. The axle has a right and a left side. The right side has a little shoulder or stop for the right cone.


The left side is the adjusting cone side. Threaded longer then the right, the cone and locknut and be adjusted at any point needed.


As long as the wheel is placed in the dropouts correctly, once the wheel is adjusted, by theory, it will not come loose.

This hub has a slotted axle for a tonged washer. There is no such washer with this years hub, so using the slot as left side/right side identification works for someone that understands the hub. Other than the slotted axle, there is no other indication of replacing the wheel correctly.


Finished with a beautifully designed oil clip, the Raleigh Roadster front hub is a work of art and another reason why we love these bicycles so much, Elegance in Mechanical and Rideable design!


Note: This oil clip design was copied by Campagnolo for the Nuovo Record Hubs without the extra little end tabs to help in removal.

Monday, January 23, 2012

Raleigh Project One, The Bar and Stem

If you look back the the first photos of the Raleigh Project, you will notice how bad the bar and stem were. Looking at a finished bicycle as well as riding, its important to have a clean, good looking handlebar. The attention is drawn to the brake lever and when ever anyone stands near a bike they look at the bars and squeeze the brakes. I'm not sure where this comes from, but everyone seems to do it.

When I went to remove the bar and stem form the bike, it was so stuck that both the expander bolt and the sides of the stem were crushed.
Searching the "Pile" in the basement here at home, I found a bar and stem from a 1930's Raleigh I had used for a Fixed Gear Project years ago.


Never say "Never!" Look how beautifully this Bar and stem cleaned up with a little steel wool, white polishing compound and my favorite, Elbow Grease!


Raleigh Project One, Out from the Bag

After sitting tightly wrapped in a plastic bag covered in "Proofide" the saddle is now ready to come out.


Looking back to before anything had been done, you can see noticeable improvement and how the leather is moist and elastic rather then dry, pressed paper.


Area's around the rivets are now ready to bare weight without tearing, Over time the leather will develop a nice shine as it was once intended to have.


The saddle is now ready for its final polish and replacement of the seat clamp and seat post. No need to remove any of the extra Proofide on the underside of the saddle, It will continue to protect the saddle from drying as time goes by.